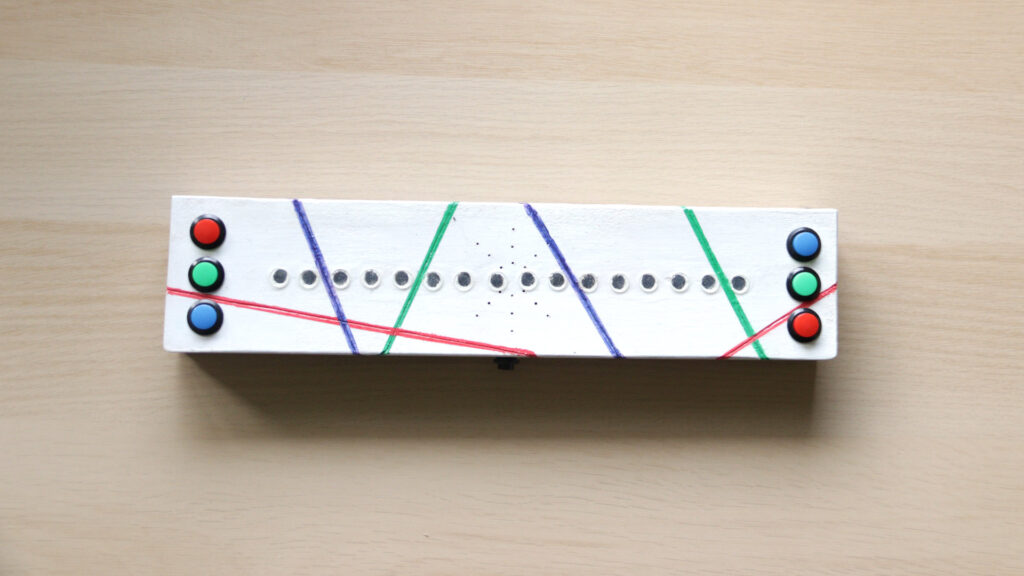
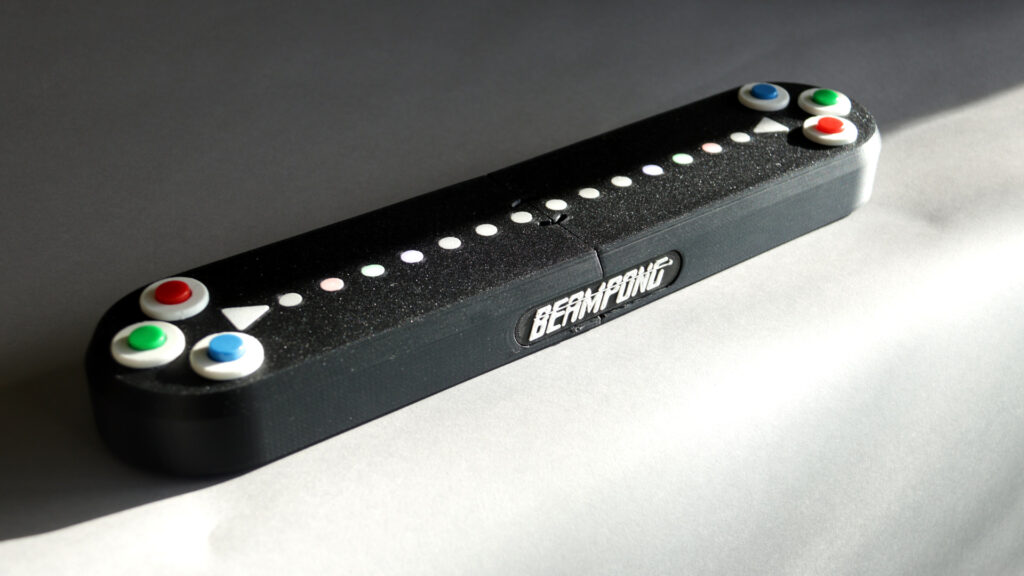
This is Beampong, a tabletop arcade game I designed from scratch for two players to enjoy face-to-face. In an era where most gaming happens on individual screens, I wanted to create something that brings people together around a shared physical space, complete with LED light effects, musical notes, and three distinct play modes.
https://youtu.be/ZiBtZ8zuaW0
The result is a battery-powered portable device, and like all my other toys and musical instruments its source code and construction files are open and free to download and reuse.
It uses light effects and musical notes in three different play modes tied together by a correlation between colors, musical notes, and chords.
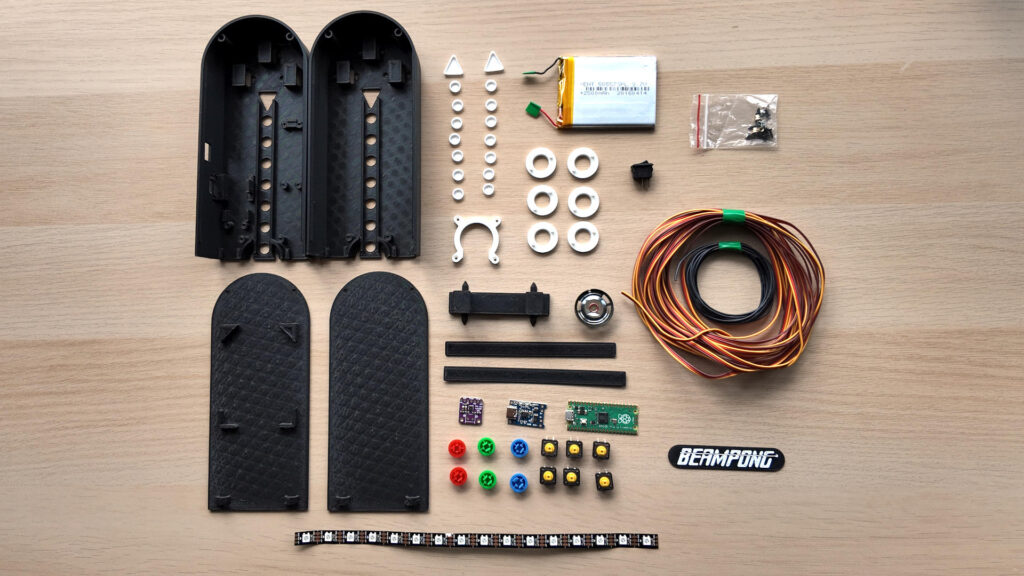
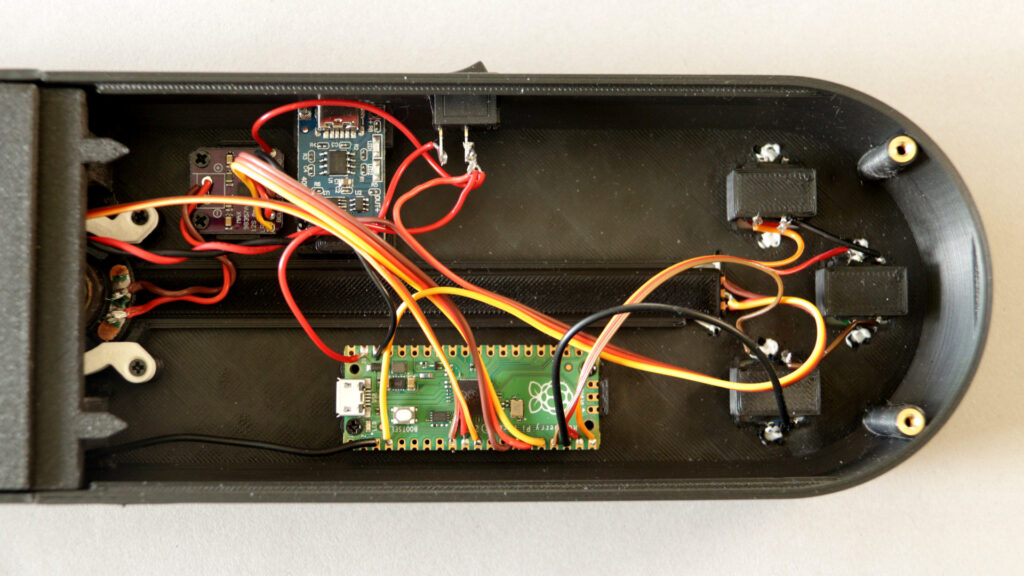
The device is built around a Raspberry Pi Pico (compatible with both RP2040 and RP2350 variants) and includes:
LED Strip: 16 WS2812B pixels (60 per meter, configurable)
Controls: 6 push buttons with red, green, and blue caps (three per player)
Audio: I²S DAC + amplifier (Adafruit MAX98357 or compatible) with a 4Ω 3W speaker
Power: 2000mAh Li-Po battery with TP4056 charging module
Enclosure: Custom 3D-printed case with OpenSCAD source files available
All GPIO pin assignments are configurable in config.h, making it easy to adapt the design to different hardware revisions.
The full project is open source, including firmware source code, 3D printable enclosure files, assembly instructions, and schematics. Whether you want to build your own, modify the game mechanics, or just learn from the design, everything is open for you to explore.
All melodies were composed specifically for this game.
A couple of months ago a family friend had a very serious health issue that left him temporarily unable to speak or move much.
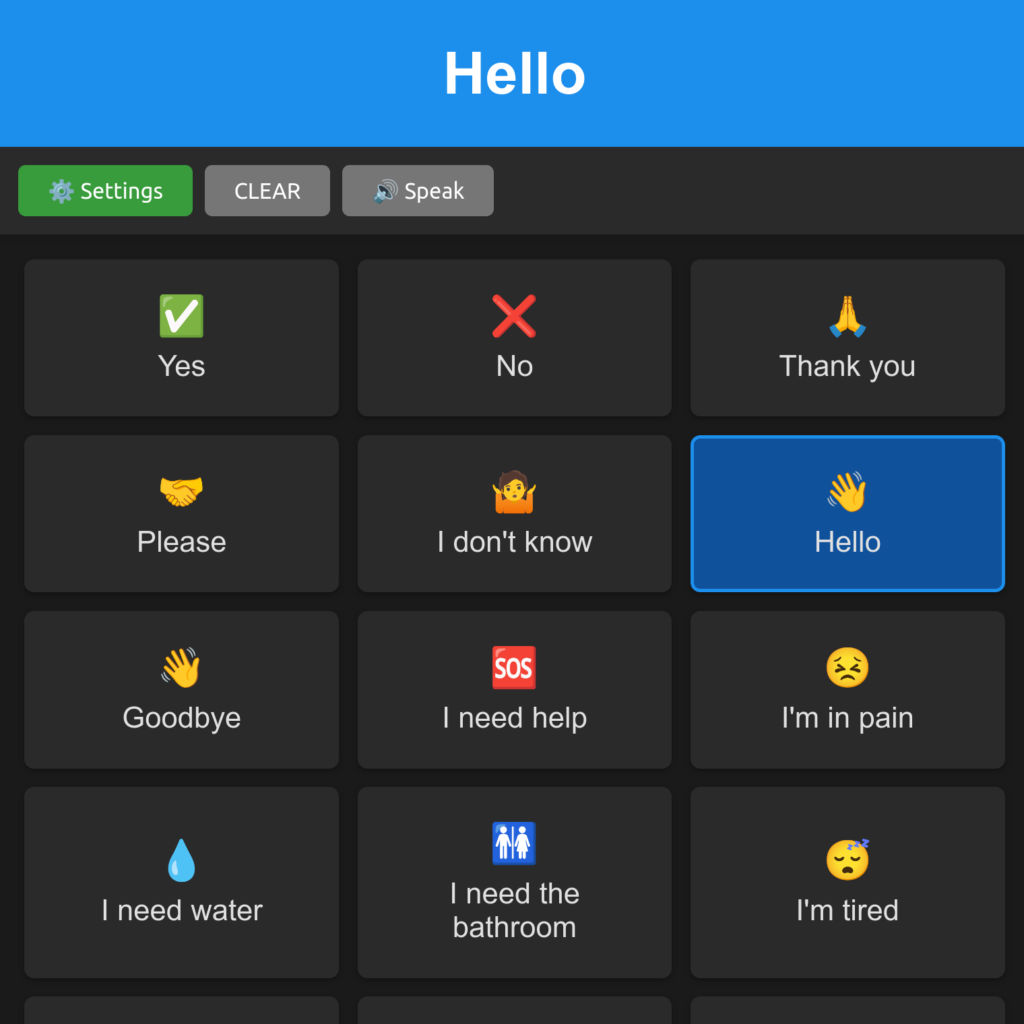
So I put together a web app connected to a game controller, in a way that he could just select phrases from a list to communicate. Luckily this person got better quickly, and this app was no longer needed, but I decided to improve this experiment and publish it as an Open Source project.
So, this is VoxEase. It can be operated with a mouse, a touch screen, a computer keyboard, a game controller using a single hand, or you can set it to scan the list of phrases automatically so you only need to press one button to pick your phrase.
VoxEase only requires a modern browser and once downloaded it works offline. It is free and open source, has no dependencies, and sends absolutely no data to external servers or trackers.
It supports multiple languages and it can also be used by people with sight impairments (it works well with screen readers).
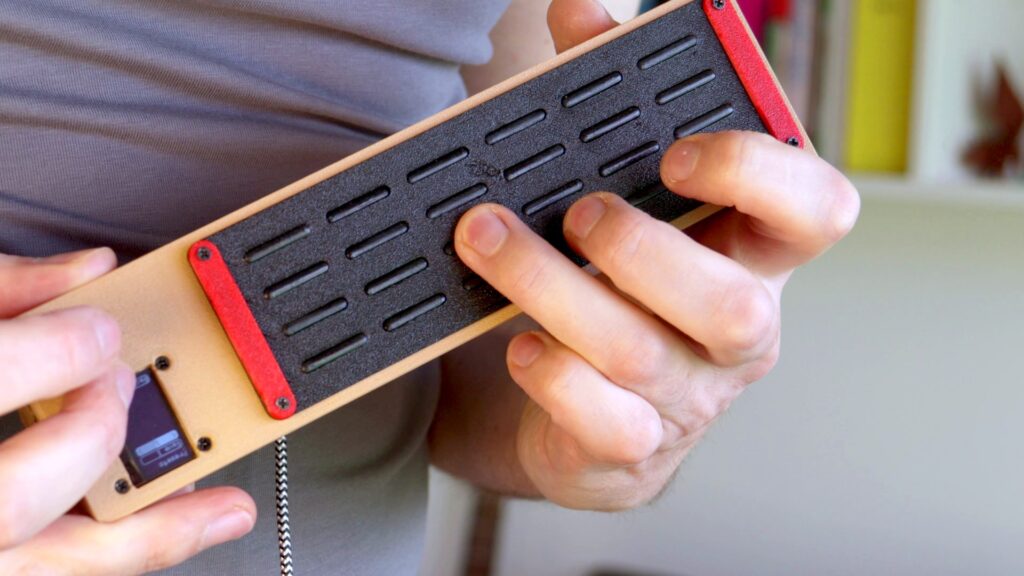
Diapasonix is a portable electronic musical instrument and MIDI controller that is played similarly to a stringed instrument. It features a capacitive touchpad fretboard, I²S audio output, and a built-in synthesizer with chainable audio effects powered by the AMY synthesis engine.
Its four-string, six-fret layout (24 touch points total) can be set up to match traditional stringed instruments like guitar, bass, ukulele, violin, double bass, banjo, and so on. If you can play any of these instruments, you can play Diapasonix!
I²S audio output with built-in speaker support and amplified audio output
SSD1306 OLED display
Directional switch for navigation and parameter selection
Multiple audio effects: reverb, chorus, echo/delay, distortion, and low-pass filter
Per-string tuning and capo transposing
Strumming mode and tapping mode
Left-handed mode support
MIDI output support (optional, can be disabled to use USB as stdio)
Battery level monitoring and low battery indicator
Automatic storage and retrieval of settings
Four user presets for saving and recalling complete instrument configurations
Volume control
Display contrast control with automatic dimming
Synth Engine and Instrument Presets
Diapasonix uses the AMY synthesis engine, a high-performance fixed-point music synthesizer library. AMY supports multiple synthesis types, but currently Diapasonix offers only the ability to recall any of the 256 built-in presets: 128 patches based on the Juno-6 synthesizer and 128 patches based on the DX7 synthesizer. Each preset has a number (0-255) for easy selection. Pressing the center button while the patch number is selected chooses a patch at random.
Audio Effects
Diapasonix includes five audio effects that can be enabled and configured:
Reverb
Liveness control (room size)
Damping control
Crossover frequency
Chorus
Maximum delay time
LFO frequency
Modulation depth
Echo/Delay
Delay time (10-200 ms)
Feedback amount
Filter coefficient
Filter
Low-pass filter with adjustable cutoff frequency (20 Hz – 20 kHz)
Resonance (Q factor) control
Distortion
Level control (0.0 to 1.0) – amount of distortion effect
Gain control (1.0 to 2.0) – drive/gain before distortion
Fretboard and Playing Modes
The fretboard consists of four strings, each with six frets, providing a total of 24 touch points. Two playing modes are available:
Strumming Mode: Notes trigger only when you strum across the strings after placing your fingers on frets. In this mode, the last row of frets functions as open strings. When you hold a fret on a string and strum a fret on that last row, the corresponding note of the held fret will play. This mode mimics traditional guitar playing, allows for chord playing, and provides more expressive control.
Tapping Mode: Notes trigger immediately when any fret is touched. In this mode, the last row of frets is treated as one more fret on the board, allowing you to continue playing up the string.
The instrument also supports per-string tuning and a capo function for transposition.
Navigation and Controls
A directional switch (5-way navigation switch) is used to navigate menus and adjust parameters:
Navigate through menu items using the directional pad
Press the center button to enter/select
Long-press the center button to exit or access secondary functions
Adjust parameter values using directional controls
Settings
From the settings screen, you can configure:
Playing Mode: Toggle between strumming and tapping modes
Left-handed Mode: Flip both the screen and the entire fretboard orientation, allowing left-handed players to use the instrument naturally
Volume: Adjust output volume (0-8 range)
Display Contrast: Adjust OLED brightness or enable automatic dimming
Tuning
The tuning screen allows you to:
Set individual string pitch (default: E2, A2, D3, G3)
Adjust capo position for transposition
Fine-tune each string independently
Presets
Diapasonix includes a preset system that allows you to save and recall complete instrument configurations. Each preset stores a snapshot of:
Current synth patch number
All effect states (on/off) and their parameters:
Reverb (liveness, damping, crossover)
Chorus (max delay, LFO frequency, depth)
Echo/Delay (delay time, feedback, filter coefficient)
Distortion (level, gain)
Filter (cutoff frequency, resonance)
String tuning (individual pitch for each string)
Capo position
Playing mode (strumming or tapping)
Automatic Save
Diapasonix automatically stores the current settings into its flash memory, with a configurable delay (default 10 seconds) to minimize flash wear. Stored settings are loaded automatically at startup. The Pico onboard LED will flash briefly when data is being written to flash memory. There is a very short gap in the audio output, barely audible, when data is being written to flash.
Defaults Configuration
All advanced user-configurable options and defaults are defined in the file [config.h](config.h). You can, for example, change pin numbers, MPR121 sensitivity, timing-related values, effect defaults, and enable or disable MIDI output. If you want to change any default configuration options, you’ll need to build the sources and generate your own uf2 file to flash to the Pico 2.
Compiling
Building the sources requires the Raspberry Pi Pico SDK.
git clone https://github.com/TuriSc/Diapasonix.git
cd Diapasonix
git submodule update --init --recursive
mkdir build && cd build
cmake -DPICO_PLATFORM=rp2350 ..
make
Bill of Materials
Raspberry Pi Pico 2 (RP235x)
2x MPR121 (touch sensors)
MAX98357 I²S DAC (or similar)
SSD1306 OLED display (128×64, 0.96″)
Directional switch (5-way navigation switch)
Speaker (4Ω 3W recommended, but 8Ω 2W is fine too)
3.5mm audio jack, switched
18650 Lithium battery
One pair of springs for 18650 battery
TP4056 (charger module)
Power switch
Custom PCB (can be swapped for a diy solution)
Electrical wire and connectors
3D-printed enclosure (printable files are provided, as well as OpenSCAD sources)
I have not yet put together a step-by-step guide to assemble the Diapasonix. I might want to wait until we get to a stable version. I’m changing components and overall design and breaking things as I move. The current capacitive fretboard might undergo a major re-engineering. One note about the v1 design: the frets are 3d-printed, then dipped in conductive silver paint, and finally coated with a single layer of nail polish. They react very well to even the gentlest of touches.
Known Limitations
Synthesizer parameter configuration (beyond patch selection) is planned for future releases.
Velocity detection is not currently implemented.
Echo delay is limited to 200ms maximum due to RAM constraints on RP2350.
A Raspberry Pi Pico (RP2040) will work but with very poor performance, as the audio output will crackle noticeably.
This is an early prototype. Expect breaking changes.
Disclaimer
Diapasonix is an original, non‑commercial work created by Turi Scandurra for educational and hobbyist purposes only. The code, schematics, and documentation are provided “as‑is” without any warranties, express or implied.
The author does not claim ownership of any patents that may be relevant to the designs or implementations herein, nor does the author guarantee that the project does not infringe any existing patents, copyrights, trademarks, or other intellectual‑property rights. Users assume all risk associated with the use, modification, or distribution of this material.
By using, copying, or distributing this project you acknowledge that you have read and understood this disclaimer and agree to do so at your own discretion and responsibility.
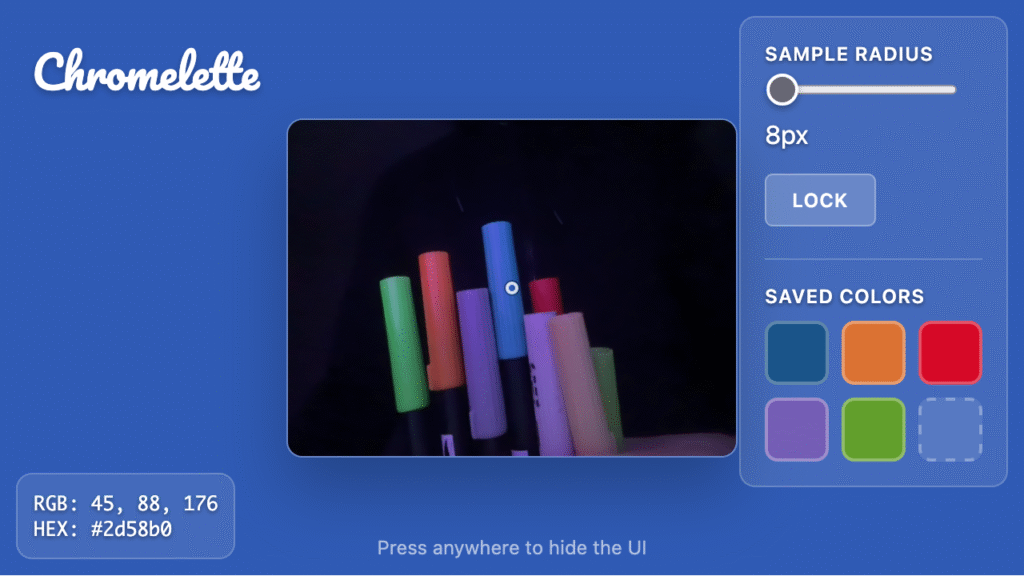
Chromelette turns your webcam into a real-time color sampler, painting your entire screen with the dominant hue from whatever you point your camera at. Perfect for ambient lighting, creative photography, and immersive color experiences.
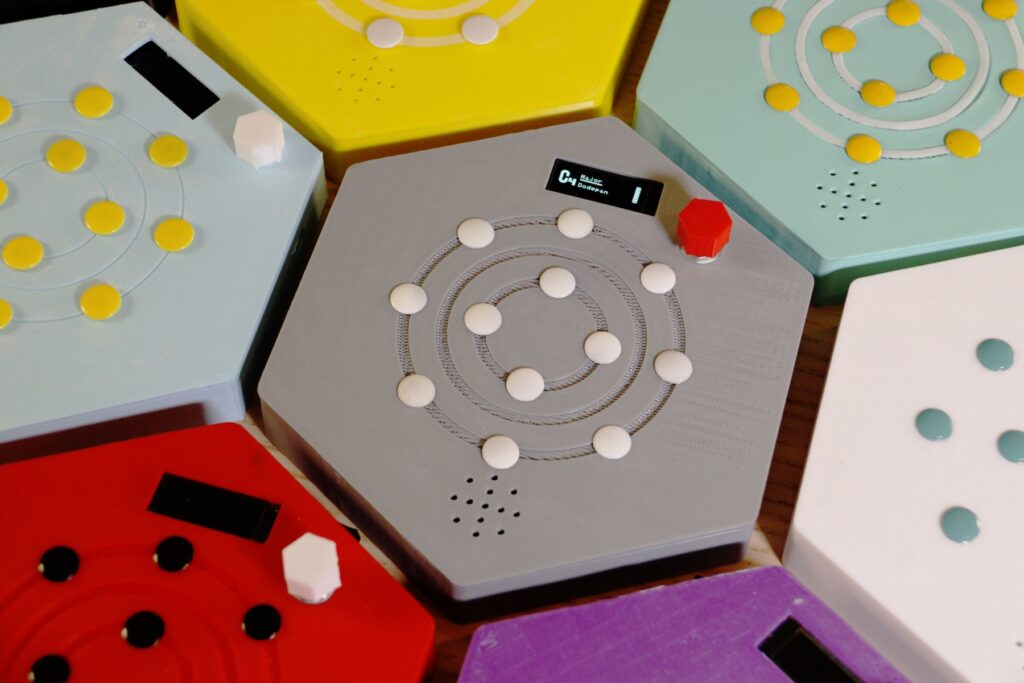
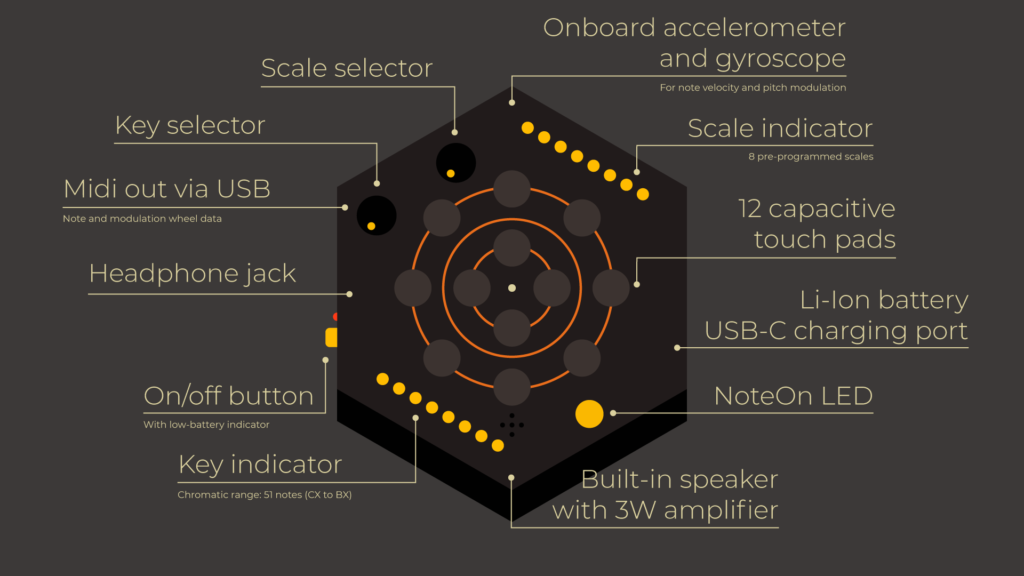
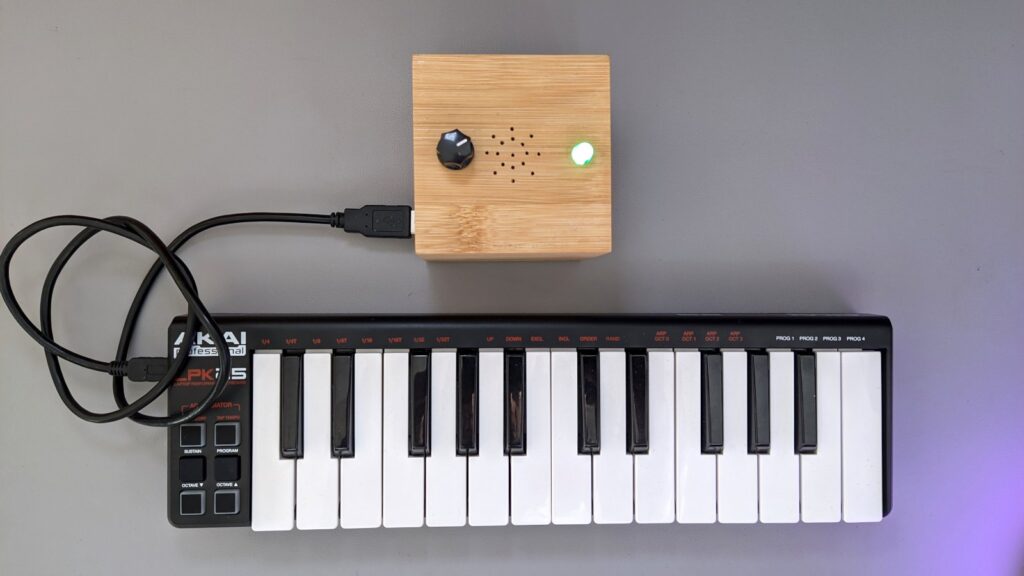
I’m finally releasing the second iteration of Dodepan, a portable musical instrument and Midi controller that I’ve been working on. It’s played by tapping on its 12 capacitive pads, and features a tilting mechanism that bends pitch and modulates filter cutoff frequency.
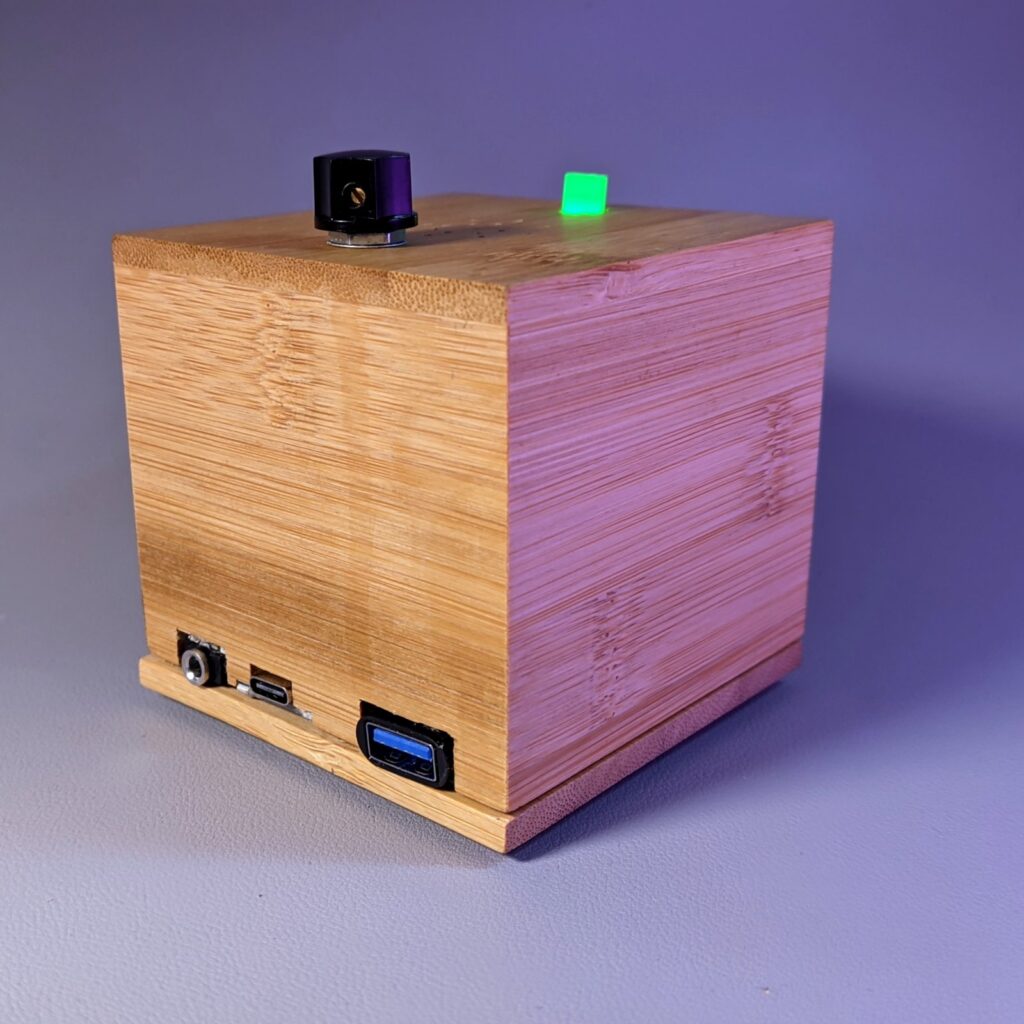
Dodepan is built around a Raspberry Pi Pico 2. It can store new instruments as user presets, it’s powered by a rechargeable battery, has a built-in speaker and audio jack, and can control music software or other instruments when connected via Midi.
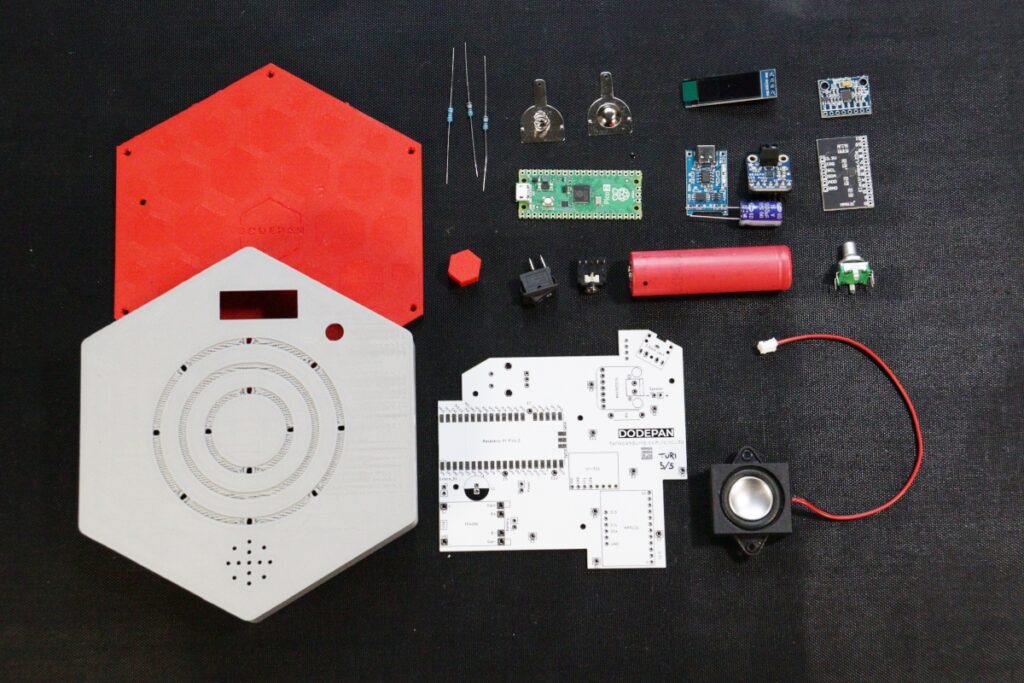
It’s open source, and anyone can build it and modify it. The project includes the 3D-printed enclosure, a custom PCB, and a comprehensive guide to get you started.
A revamped synth engine for a toy keyboard, with instrument presets and Midi out.
A friend gifted me a cheap toy musical keyboard. The sound quality was atrocious, and it could only play one note at a time. So I removed its circuitry while keeping its enclosure, speaker, and keybed, and with some tinkering and a Raspberry Pi Pico I turned it into something usable.
I made a video showing the makeover. The soundtrack is entirely played on the Picophonica, recorded one instrument at a time.
I integrated a software synthesizer into the Pico. It’s pico_synth_ex by Ryo Ishigaki – ISGK Instruments. The new engine boasts two oscillators, featuring descending sawtooth and square waveforms, a customizable filter with resonance control, cutoff modulation, a Decay-Sustain amp envelope, and an LFO for added modulation possibilities. I managed to rewire a secondary keypad with fourteen keys, using it to recall the presets and change instrument parameters. The existing, rather pointless 3.5mm microphone input found a new purpose as an audio output, while a USB-C port exposed through a simple adapter enables Midi-out functionality.
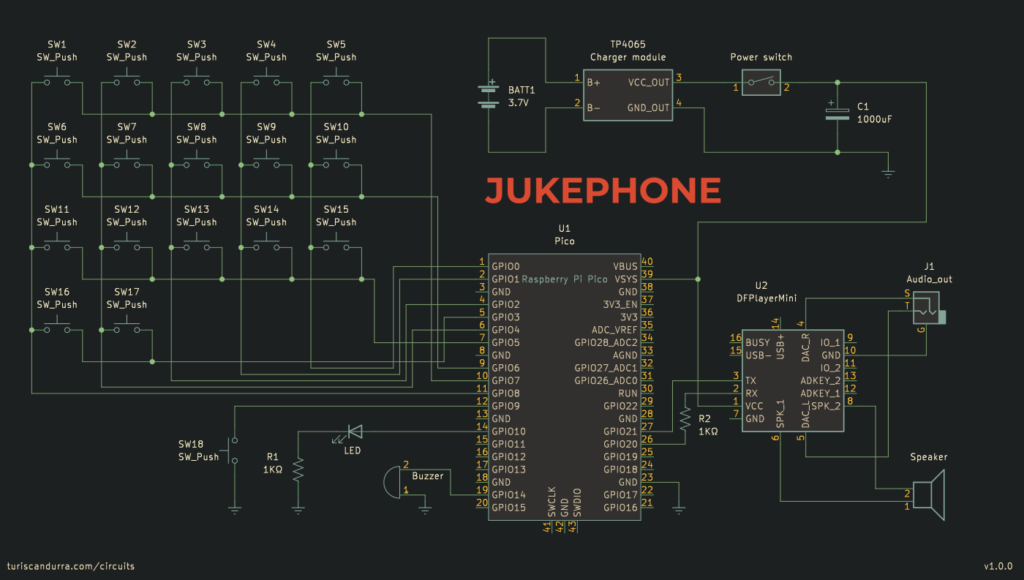
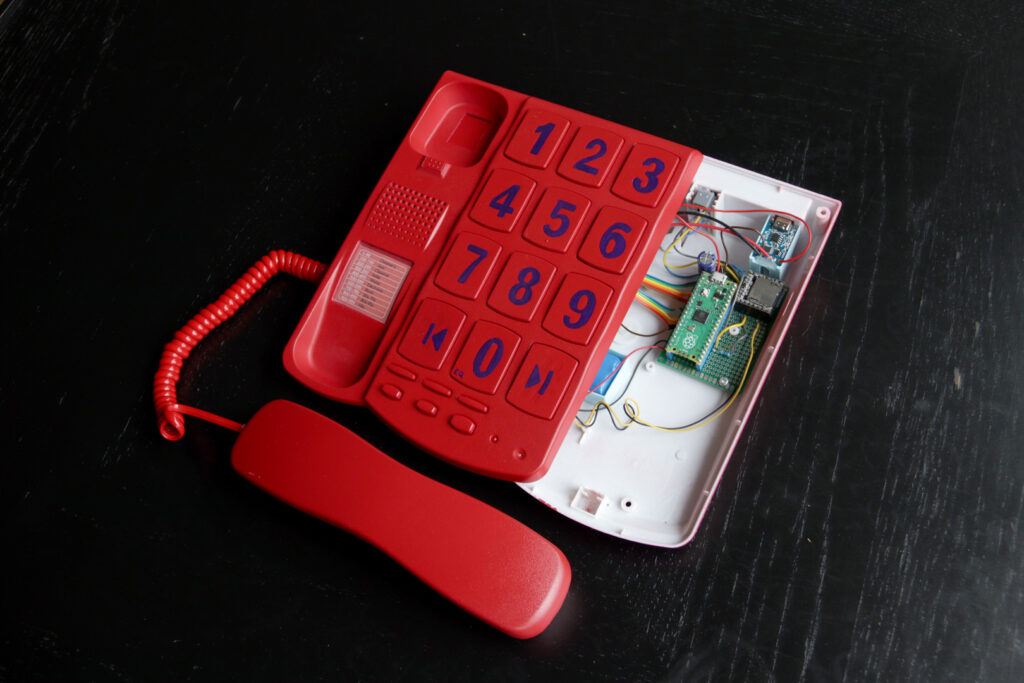
I found a big button corded telephone and decided to paint it red and turn it into a jukebox.
A Raspberry Pi Pico is used to read the keypresses, process the input, send the Mp3 player instructions via UART, and provide feedback through the LED and buzzer. The output pins of the Mp3 player are connected to the speaker inside the handset. There’s also a 3.5″ mini-jack port, to use headphones. The switch below the handset is used as a power switch. The whole Jukephone is powered by a lithium battery rechargeable via USB. I loaded the MicroSD card with 999 Mp3 files, organized so that there’s one hundred per genre (except the first one). Specific tracks can be invoked by typing their number on the keypad.
Other available functions are:
Previous / Next track
Adjust volume
Pause / Resume
Play a random track (with no repeats)
Change equalizer settings (5 presets available)
Repeat single track on / off
Restart current track
Schematic and BOM
Landline telephone (I’m afraid rotary dials are not covered here)
Raspberry Pi Pico
DFPlayer mini (or MP3-TF-16P clone) – MH2024K-24K, MH2024K-16SS and many more chips are supported
MicroSD card. 8GB or more is recommended.
TP4056 battery charger module
18650 or equivalent lithium battery
1000uF electrolytic capacitor
2x 1KΩ resistor
3.5″ audio socket
The specific telephone I used had a keypad matrix with 17 keys, an LED, a buzzer, and another key not on the matrix. You should be able to adapt the code to your hardware.
Among the telephone components you should be able to use the keypad matrix, handset speaker, handset switch, buzzer, LED, as well as most of the wiring and connectors.
Octopush is a set of building blocks, a modular construction toy. All the blocks have the same shape, and can be connected to one another in many different ways.
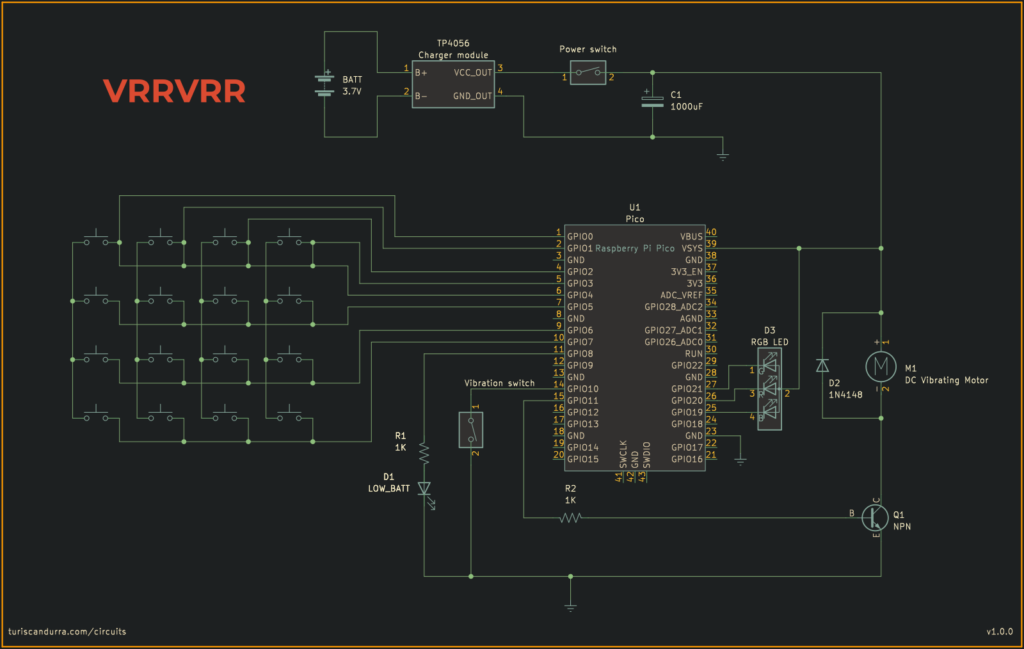
VRRVRR is a visual and haptic metronome, an aid for musicians.
Unlike traditional metronomes, it keeps the tempo by vibrating and blinking its LEDs.
It allows you to type or tap a desired tempo, and store it into one of the four available preset slots.
You can enable accents and beat subdivisions.
VRRVRR is made with easily available electronic components. It’s build around an inexpensive and very common keypad matrix, and at its heart there is a Raspberry Pi Pico.
Everything is powered by a lithium battery rechargeable via USB, and there’s a little LED indicator that tells you when it’s time to recharge it.
I sanded the corners of the acrylic sheet to make them roundHere you can see the miniature vibration motorCommon-anode, non-addressable RGB LEDs, wired in parallelThe enclosure was created from scratch with basswood
A dashboard to let kids play with basic electronic components. It’s filled with switches, toggles, potentiometers, and LEDs. It also features a tone generator, a timer, a motor, and a photoresistor.
Dodepan is a chromatic percussive instrument – like a lo-fi electronic version of a marimba or handpan.
It’s played by tapping on its twelve (dodeka in Greek) capacitive metal pads. The lowest note it can produce is C2 (Midi number 36), the highest D8 (Midi number 110), so its chromatic range is 75 notes. One of its two knobs controls the current key (or root note), which ranges from C3 to B4. The other knob is used to select one of the sixteen scales available. It’s polyphonic, up to six concurrent voices (but more can be enabled in the settings). Each one of the twelve pads is assigned to a note based on the current scale and key, following a zigzag layout and repeating notes at higher octaves when needed.
To make the instrument more expressive, an MPU-6050 IMU (Inertial Measurement Unit) is used to convert the intensity of a tap into velocity data, so that hard taps play louder and soft taps play quieter. In addition to the accelerometer, the IMU also provides gyroscope data, which Dodepan uses to perform pitch bending, a trick I borrowed from a previous toy synth I made, the TS-DET1.
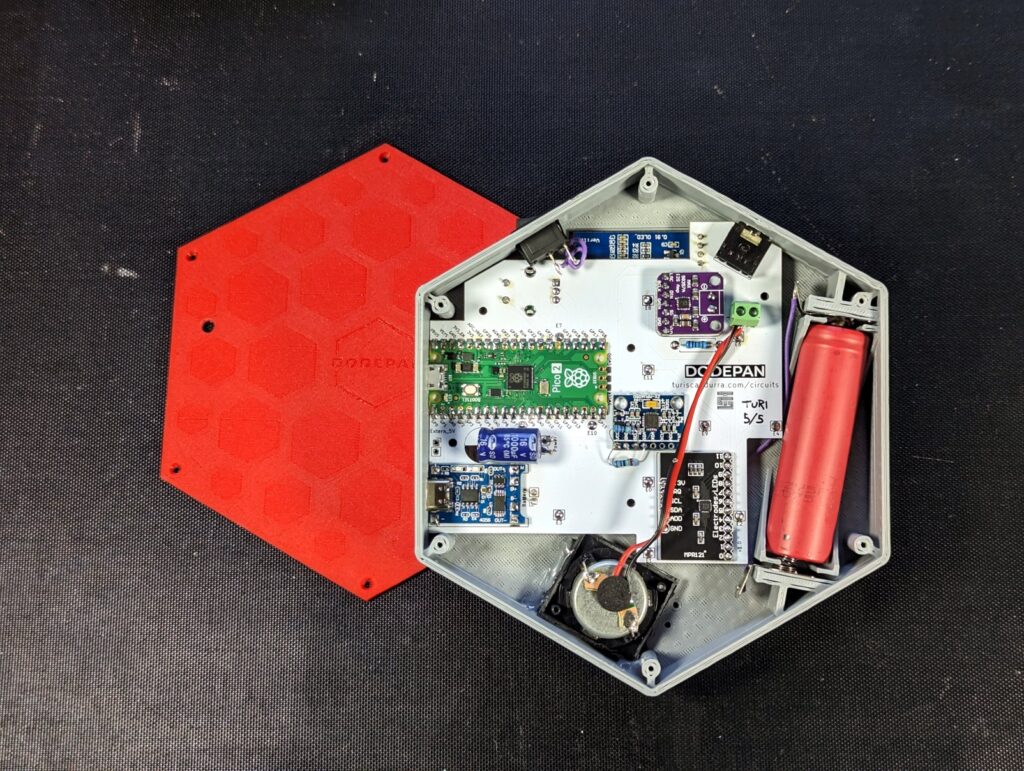
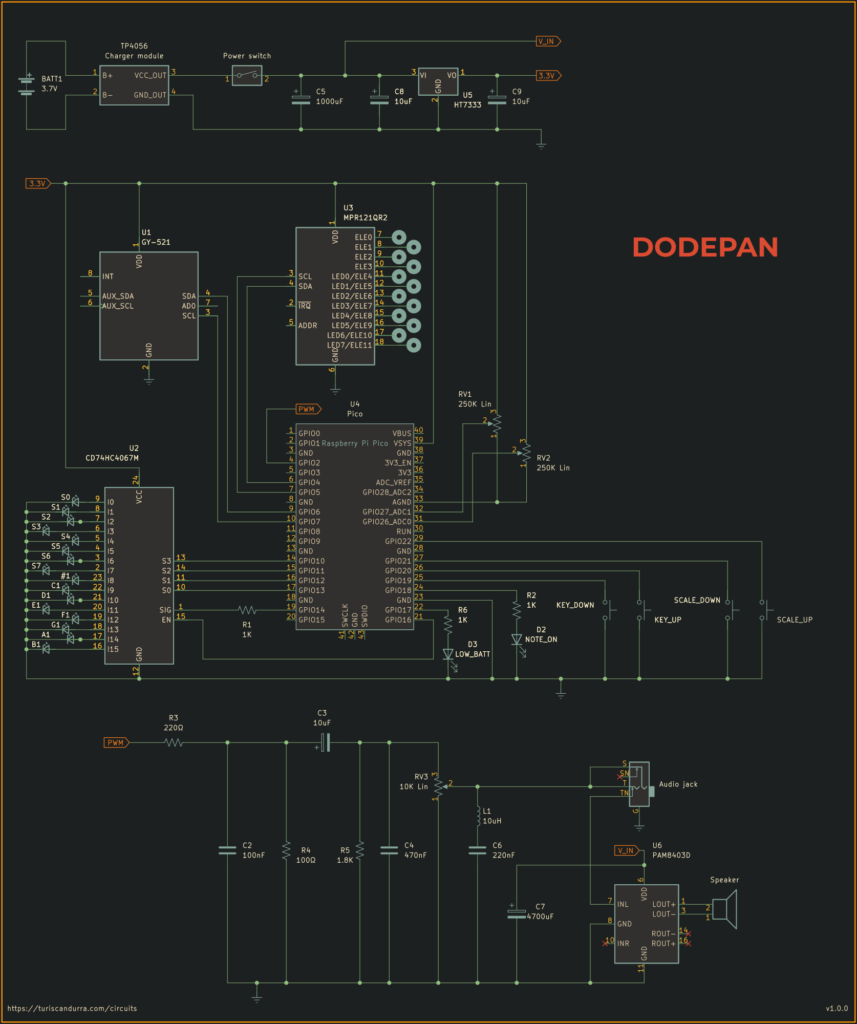
The central unit of the circuit is a Raspberry Pi Pico. It aggregates and parses knob values and tap data from the MPR121 capacitive touch module, and displays taps, key and scale info via LEDs (through a 74HC4067 demultiplexer). Very importantly, the Pico outputs sound via pulse-width modulation. An analog circuit further processes the signal, acting as a digital-to-analog converter with volume control and noise suppression, before taking the sound to a PAM8403 amplifier that drives the built-in speaker. There’s also a headphone jack socket of the switched type, so when it’s in use, the speaker is disabled.
When connected via USB to a computer or a Midi-compliant host instrument, Dodepan will show up as a Midi device, sending note events (note on with velocity, and note off) and pitch wheel modulation data.
The original note samples are a combination of synthesized marimba and balafon samples, and were created in MusE Sequencer using DeicsOnze, an emulator of the Yamaha YM2414, the FM sound chip powering the Yamaha DX11 and TX81Z synthesizers. They have been resampled to 22050Hz and their resolution lowered to 8bit (using dithering), before converting them to header files using wav2c.
Everything is powered by a 3.7V li-ion battery, recharged by a TP4056 module via USB-C. An HT7333-A LDO is in place to make sure that the circuit never gets more than 3.3V, with the exception of the amplifier, which is fed straight unregulated voltage with no sweetener.
Schematic
Built-in scales
Sixteen scales are available:
Major (ionian)
Natural minor (aeolian)
Harmonic minor
Dorian
Lydian
Mixolydian
Locrian
Phrygian
Phrygian dominant
Pentatonic major (Diatonic)
Pentatonic minor
Pentatonic blues
Arabian
Oriental
Japanese
Chromatic
It’s easy to change the existing ones or add more.
A note about sound quality
The memory limitations of the Raspberry Pi Pico require the samples to be reduced to 8bit, which makes them noisy – there’s no way around that. An LC filter, formed by the inductor and the 220nF cap, helps to partly reduce the hiss introduced by downsampling and dithering of the audio sources. Further improvement comes from the very large cap, also required to stabilize the PAM8403D (which will stutter without it).
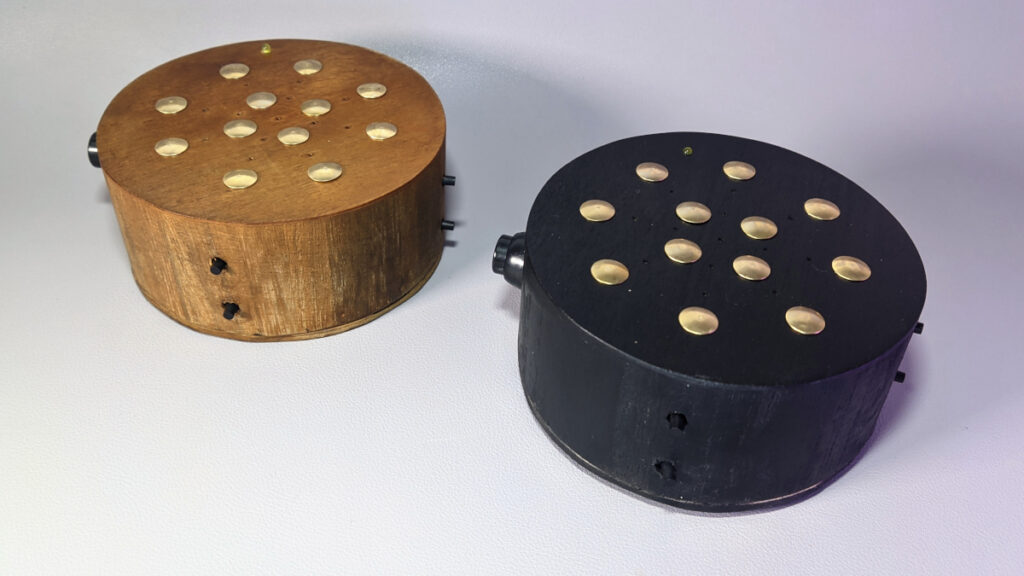
Alternative builds
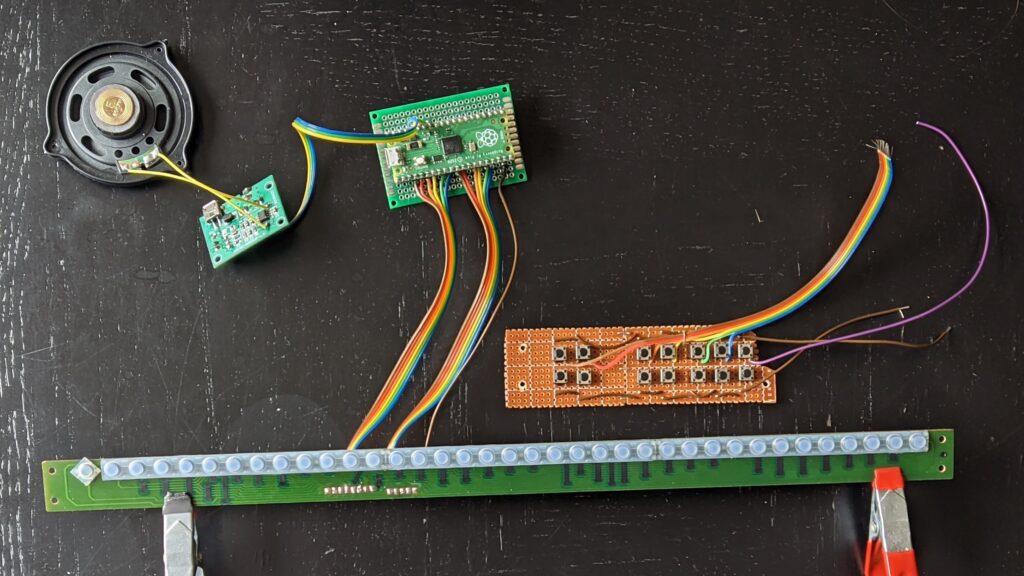
A minimal build requires only the Pico, the MPR121, the speaker and an amplifier or buffer. Here are some pictures of some simplified Dodepans I made, which lack the IMU and the potentiometer. To change key and scale they use buttons instead.
If a picture is worth a thousand words, and a video is made of several pictures in a sequence, then a video is worth several thousand words. A great way to show a preview of online content is by using video thumbnails – an ambiguous term that can both refer to a static image, usually depicting one frame of the video (also known as poster image), or, more interestingly, a video preview that’s a smaller and shorter version of the referenced content.
If you arrived to this page through the homepage of my website, you might have noticed that every post on it features an animated thumbnail. It was a natural choice since most of my work on display is some form of animated media, or at least accompanied by video assets. For a long time my thumbnails have been simple animated GIFs – one of those ancient formats that managed to maintain popularity for longer than expected – but there now is a good selection of modern, more efficient formats to display motion content on the web.
Portami is a portable, battery-powered polyphonic synth built around a SAMD21 microcontroller. It’s designed to be a companion to small Midi keyboards.
My implementation focuses on USB Midi communication (Midi-in through the onboard USB-C port) and features a push button to cycle between wave types (sine, saw, square, pulse, triangle, and noise). An RGB led inside the button changes color according to the current wave type.
It should work out-of-the-box with basic keyboard controllers, like the AKAI LPK25 in the picture. Knobs can be mapped to change synth parameters like modulation speed or pitch bend range. I tested it with an AKAI MPK Mini Play, and a keyboard mapping for this specific controller is provided. There also is a debugging tool (SAMD21synthDebugger) that can be used to find the address of knobs and sliders of more controllers.
Other than the onboard speaker driven by an LM386 amplifier, Portami has a 3.5″ mini-jack port to plug a pair of headphones. The audio socket has a switching mechanism, disconnecting the speaker when in use.
The whole setup is powered by a 3.7V, 1100mAh li-ion battery, recharged and protected by a TP4056 USB-C charger module. A regulator boosts voltage to 5V, providing power to the Midi keyboard (you might want to check current requirements for your specific setup, or power the keyboard externally).
The word portami in Italian means “take me” (to a location). As in “portami con te” (take me with you).
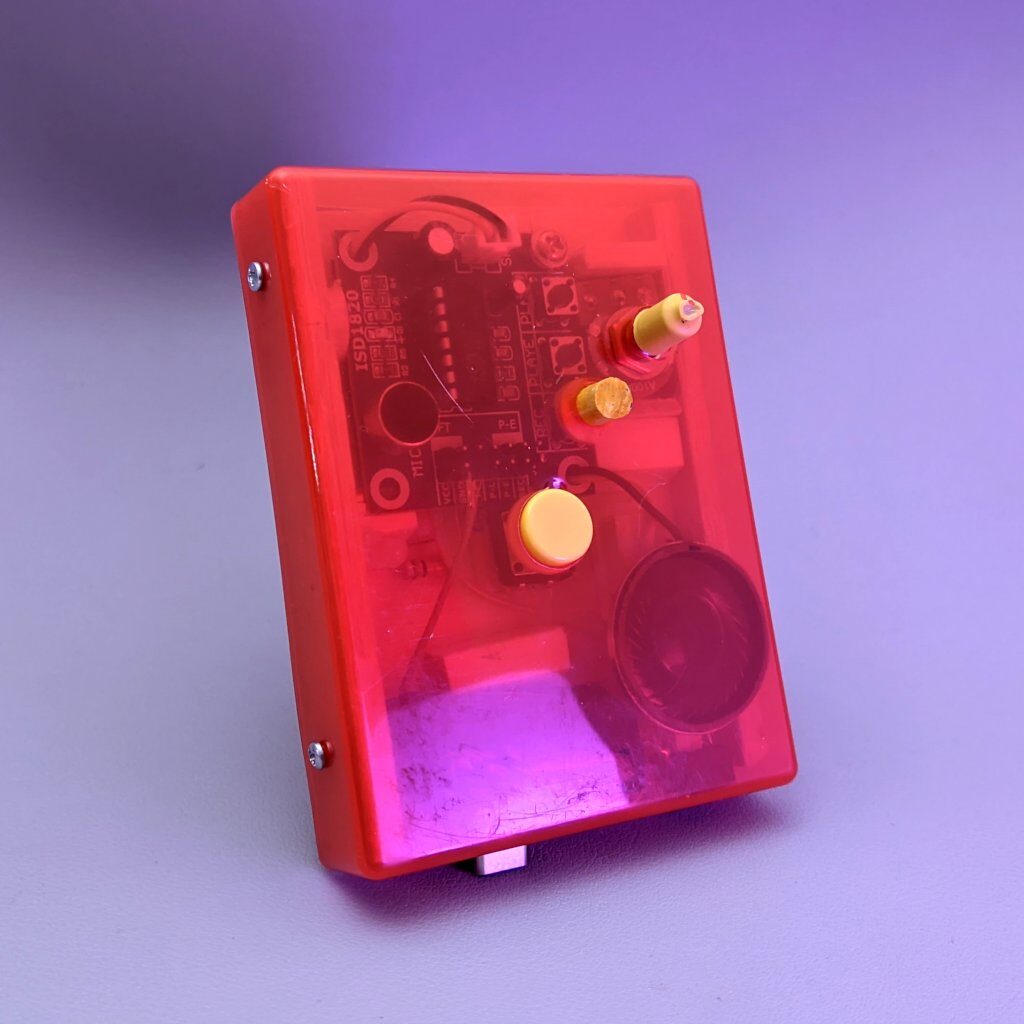
Voice recorder with pitch/speed modulation. Press one button to start recording the module’s onboard microphone. The other button plays back the sample. Turn the potentiometer to increase or decrease pitch and speed. You can sound like a chipmunk or a monster in a cave! Recordings can be about 10″ long. Powered by a rechargeable lithium-ion 550mAh battery.
A device that acts as a weather station, displaying real-time weather and astronomy data, forecasts and room temperature.
The original design and code of this project has to be credited to ThingPulse. I reworked an existing fork of that code, the German version by Mario Ammerschuber. Mario’s optimizations included, among other things, a captive portal Wifi manager, which is great to avoid hardcoding a Wifi name and password and therefore making the device more portable.
My code has been tested on two different development boards (A NodeMCU and a D1 mini)
My contribution is focused on internationalization: I created the Italian version, and speakers of a different language can easily localize all the displayed text by editing a single list of strings. I also set up the weather station to use a push-button instead of touchscreen controls, and added a DS18B20 Temperature sensor to display internal temperature alongside the weather data pulled live from OpenWeatherMap.
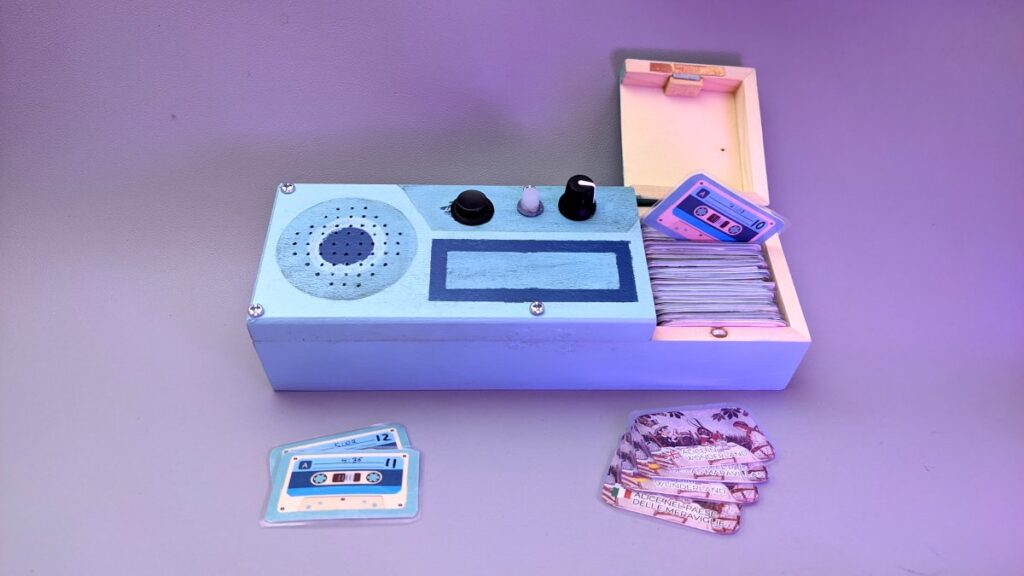
My toddler niece is too young to read but always in for a good story. So I created for her a portable audio player of children stories. It’s got a cool retro vibe for the enclosure and it’s very easy to operate: you just choose one of the many ‘tapes’ from its drawer and place it on top of the player to start playing that audiobook track.
It’s multilingual! I managed to find audio recordings of the same story in multiple languages, so for most stories there are four different tapes, one for each language. I believe this could be a good language learning device.
This project was inspired by the open source project Tonuino, from which I also borrowed the idea of using NFC tags to trigger an Arduino-controlled mp3 player. My player has fewer functions but is much easier to set up, is battery-powered, and uses a custom data format for the tags so they can be configured using a smartphone.
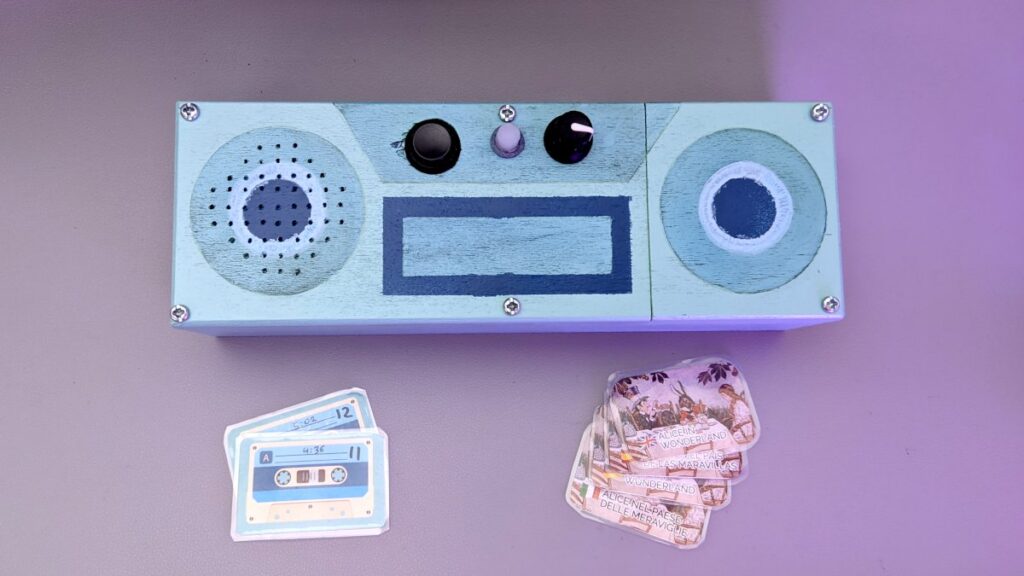
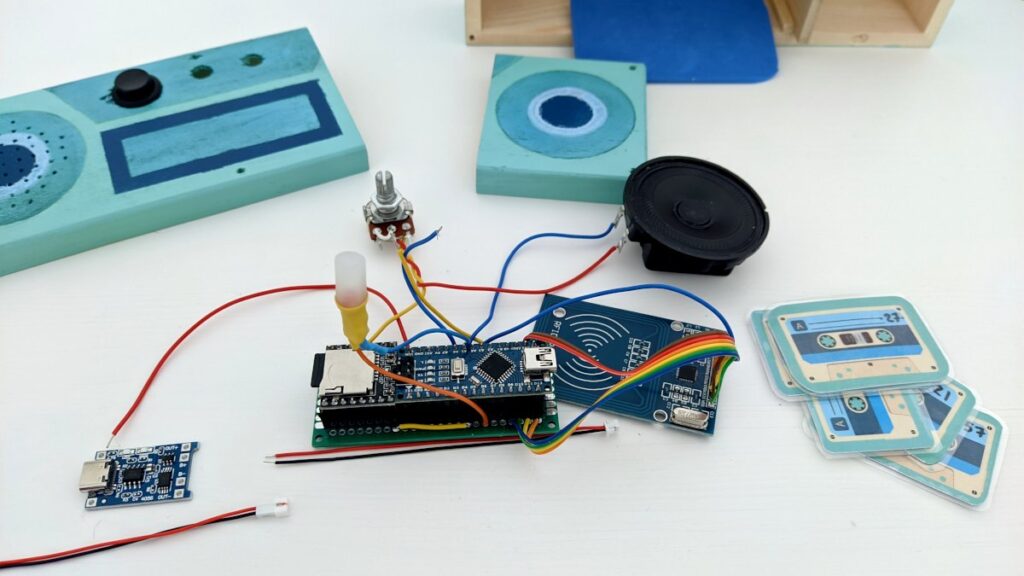
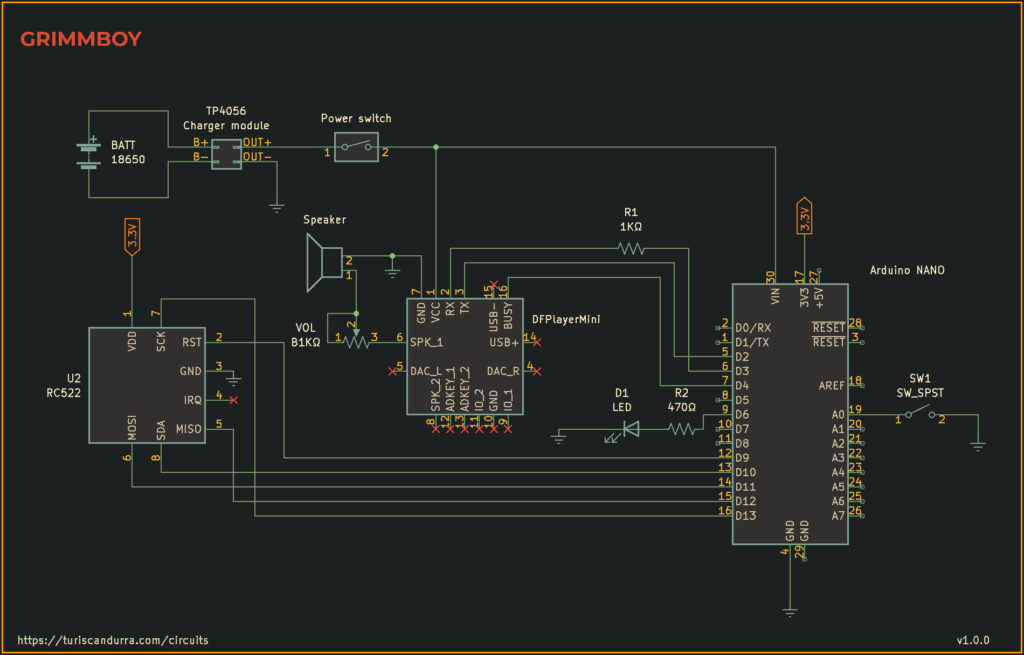
Inside the enclosure, the Grimmboy circuit uses an mp3 player chip controlled by an Arduino Nano that’s also connected to an RFID reader. Each tape has an NFC tag hidden inside, while all the audio tracks are stored on a microSD card. On the top side of Grimmboy there’s a pause/unpause button, an LED that blinks when no track is playing, and a volume knob.
The lithium-ion battery is recharged using a common USB-C smartphone charger, and is protected by a circuit that prevents overcharging and overdischarging. Even though the mp3 player supports stereo playback, for energy saving reasons I chose to make it mono and include only one speaker.
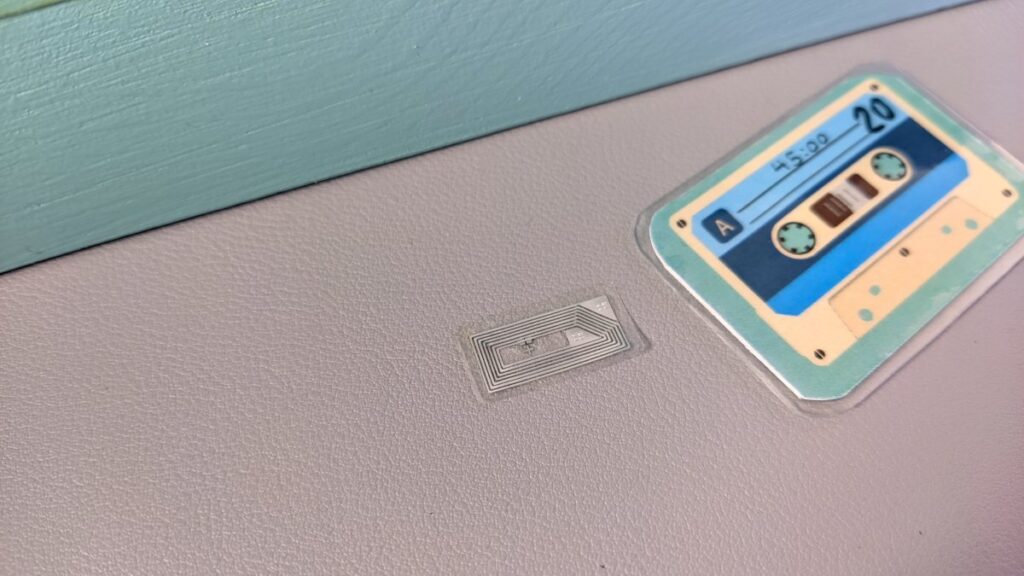
The cassette tapes contain a minuscule radio chip (Ntag213, aka MiFare Ultralight C), writable using a common tag editing app for Android. However, since I created over a hundred cards I automated the job and coded a batch-writing tool (whose source code is available, see link below). Each tag is sandwiched between two printed pieces of paper and then laminated into a microcassette-card. Side A has the story title, cover artwork, and a language flag; on side B I wrote the running time and the tag ID (which I kept note of so that if a tag gets lost I can recreate it).
One function I did not implement is automatic poweroff. It would require a power latching circuit or a more modern microcontroller but I’ll leave that to a future version.
Source code
If you want to build your own Grimmboy you can find the source code and more development notes here: github.com/TuriSc/grimmboy
– So, what do you do for a living? – I move things. – Like what? Do you move furniture? Walk animals, drive cars? Do you juggle balls, rotate stars, fly paper planes? – Yes.
A collection of my latest CGI experiments, with examples of physics simulation, material design, motion tracking and match-lighting. They’re all personal projects, as I did not include commissions or commercial work. The music track was in part performed on a new digital/analog hybrid synthesizer I’m putting together.
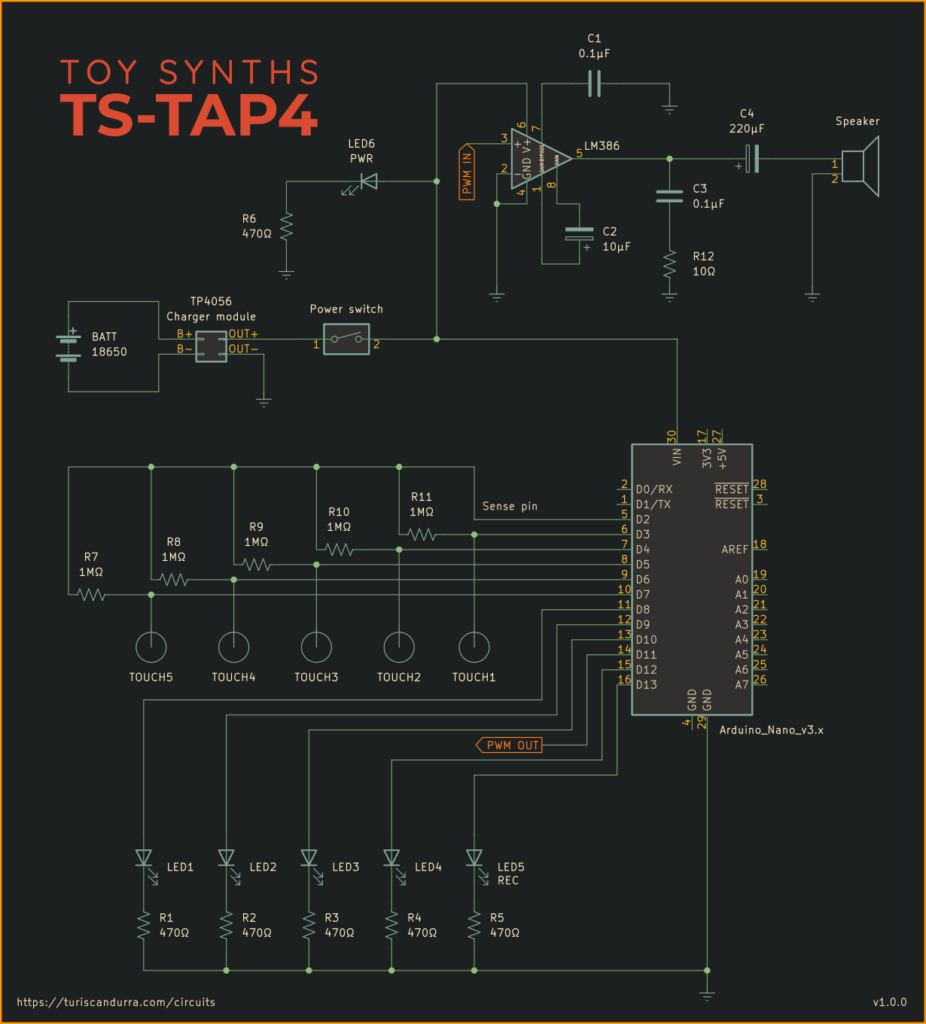
As a bass player sometimes I want a backing drum track for music practice, so I built myself this little drum sequencer, a unique touch-sensitive drum machine. I just need to tap a rhythm on its touch sensors and it will start looping my sequence right away.
This project is based on an Arduino Nano/Arduino Uno. The sound samples are unsigned 8 bit 8000 Hz WAV files that have been converted to header files in order to be compiled with the rest of the code. The touch interface works via capacitive sensing, there’s an Arduino library just for that. One of the drawbacks of using capacitive touch sensors with a battery-powered circuit is that grounding is unreliable. For this reason I surrounded the device with two rails of conductive copper tape, so that holding the device will naturally provide some grounding through the user’s hands.
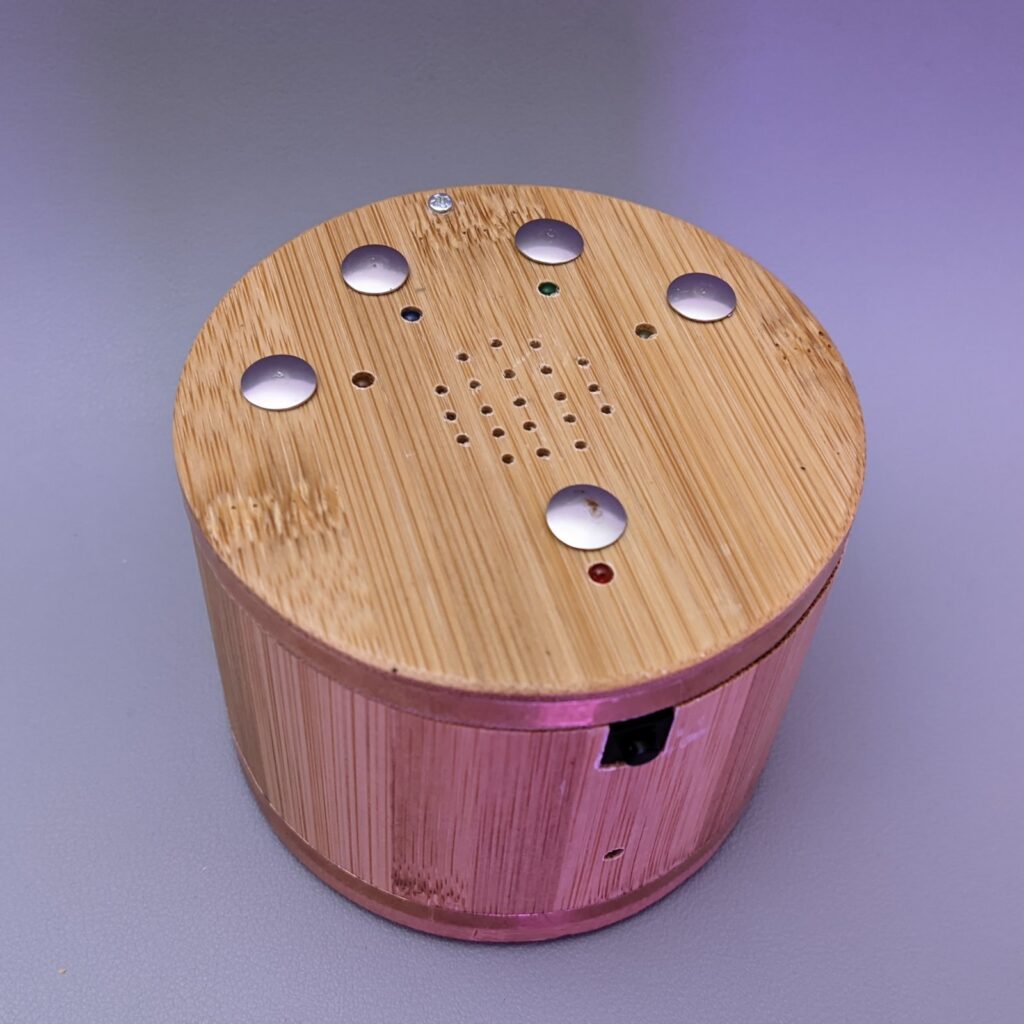
An LM386 power amplifier in a gain=200 configuration is used to drive the 8Ω speaker. The whole circuit is powered by a single rechargeable 18650 cell connected to a TP4056 charger module with USB input, which delivers a steady output at 5V. I fitted everything inside a wooden trinket box I bought specifically for this purpose, as it looked like a drum to begin with. And I love when wood and electronics get together.
It feels rewarding to use a device by leveraging its unique traits, and the BBC micro:bit has two features that are rarely found onboard other microcontrollers: a LED matrix and gyro sensor. So, I decided to design a circuit that detects and displays tilting, and uses it to alter the pitch of the notes being played. The result is a quirky musical toy, surprisingly expressive and with a personality of its own.
The input part of the instrument is a 5×5 matrix of tactile push buttons, each one paired with a diode to prevent ghosting (ghosting as in false input. Diodes won’t solve unrequited love issues.) Some of the pins used as key inputs are shared with the LED matrix, requiring to continuously switch the display off and back on, which results in a noticeable flicker. I connected the audio signal output of the micro:bit to a quad op-amp to drive two small speakers. If you’re building your own TS-DET1, you could use a single 8Ω speaker and a power op-amp, like the LM386.
I did some research and I decided to add a passive low pass filter before the amplification stage. It’s a way to soften the harshness of the pure square waves, but I also did it because I know that children are more sensitive to high frequencies than adults, and do not like beeps that are too high-pitched.
Comparison of two recordings, one with and one without the low pass filter
The whole circuit is powered by two AAA batteries and is fitted into a plastic case for playing cards.
The prototype in these pictures is now in the small hands of its new owner, and I do not plan to create new iterations. However, if I were to do it again, I would try to skip micropython and micro:bit’s music module, trying to use C instead to set my own timers to control the PWM and produce the different notes. Also, the two unused tilt axes could be used to control volume and octave shift.
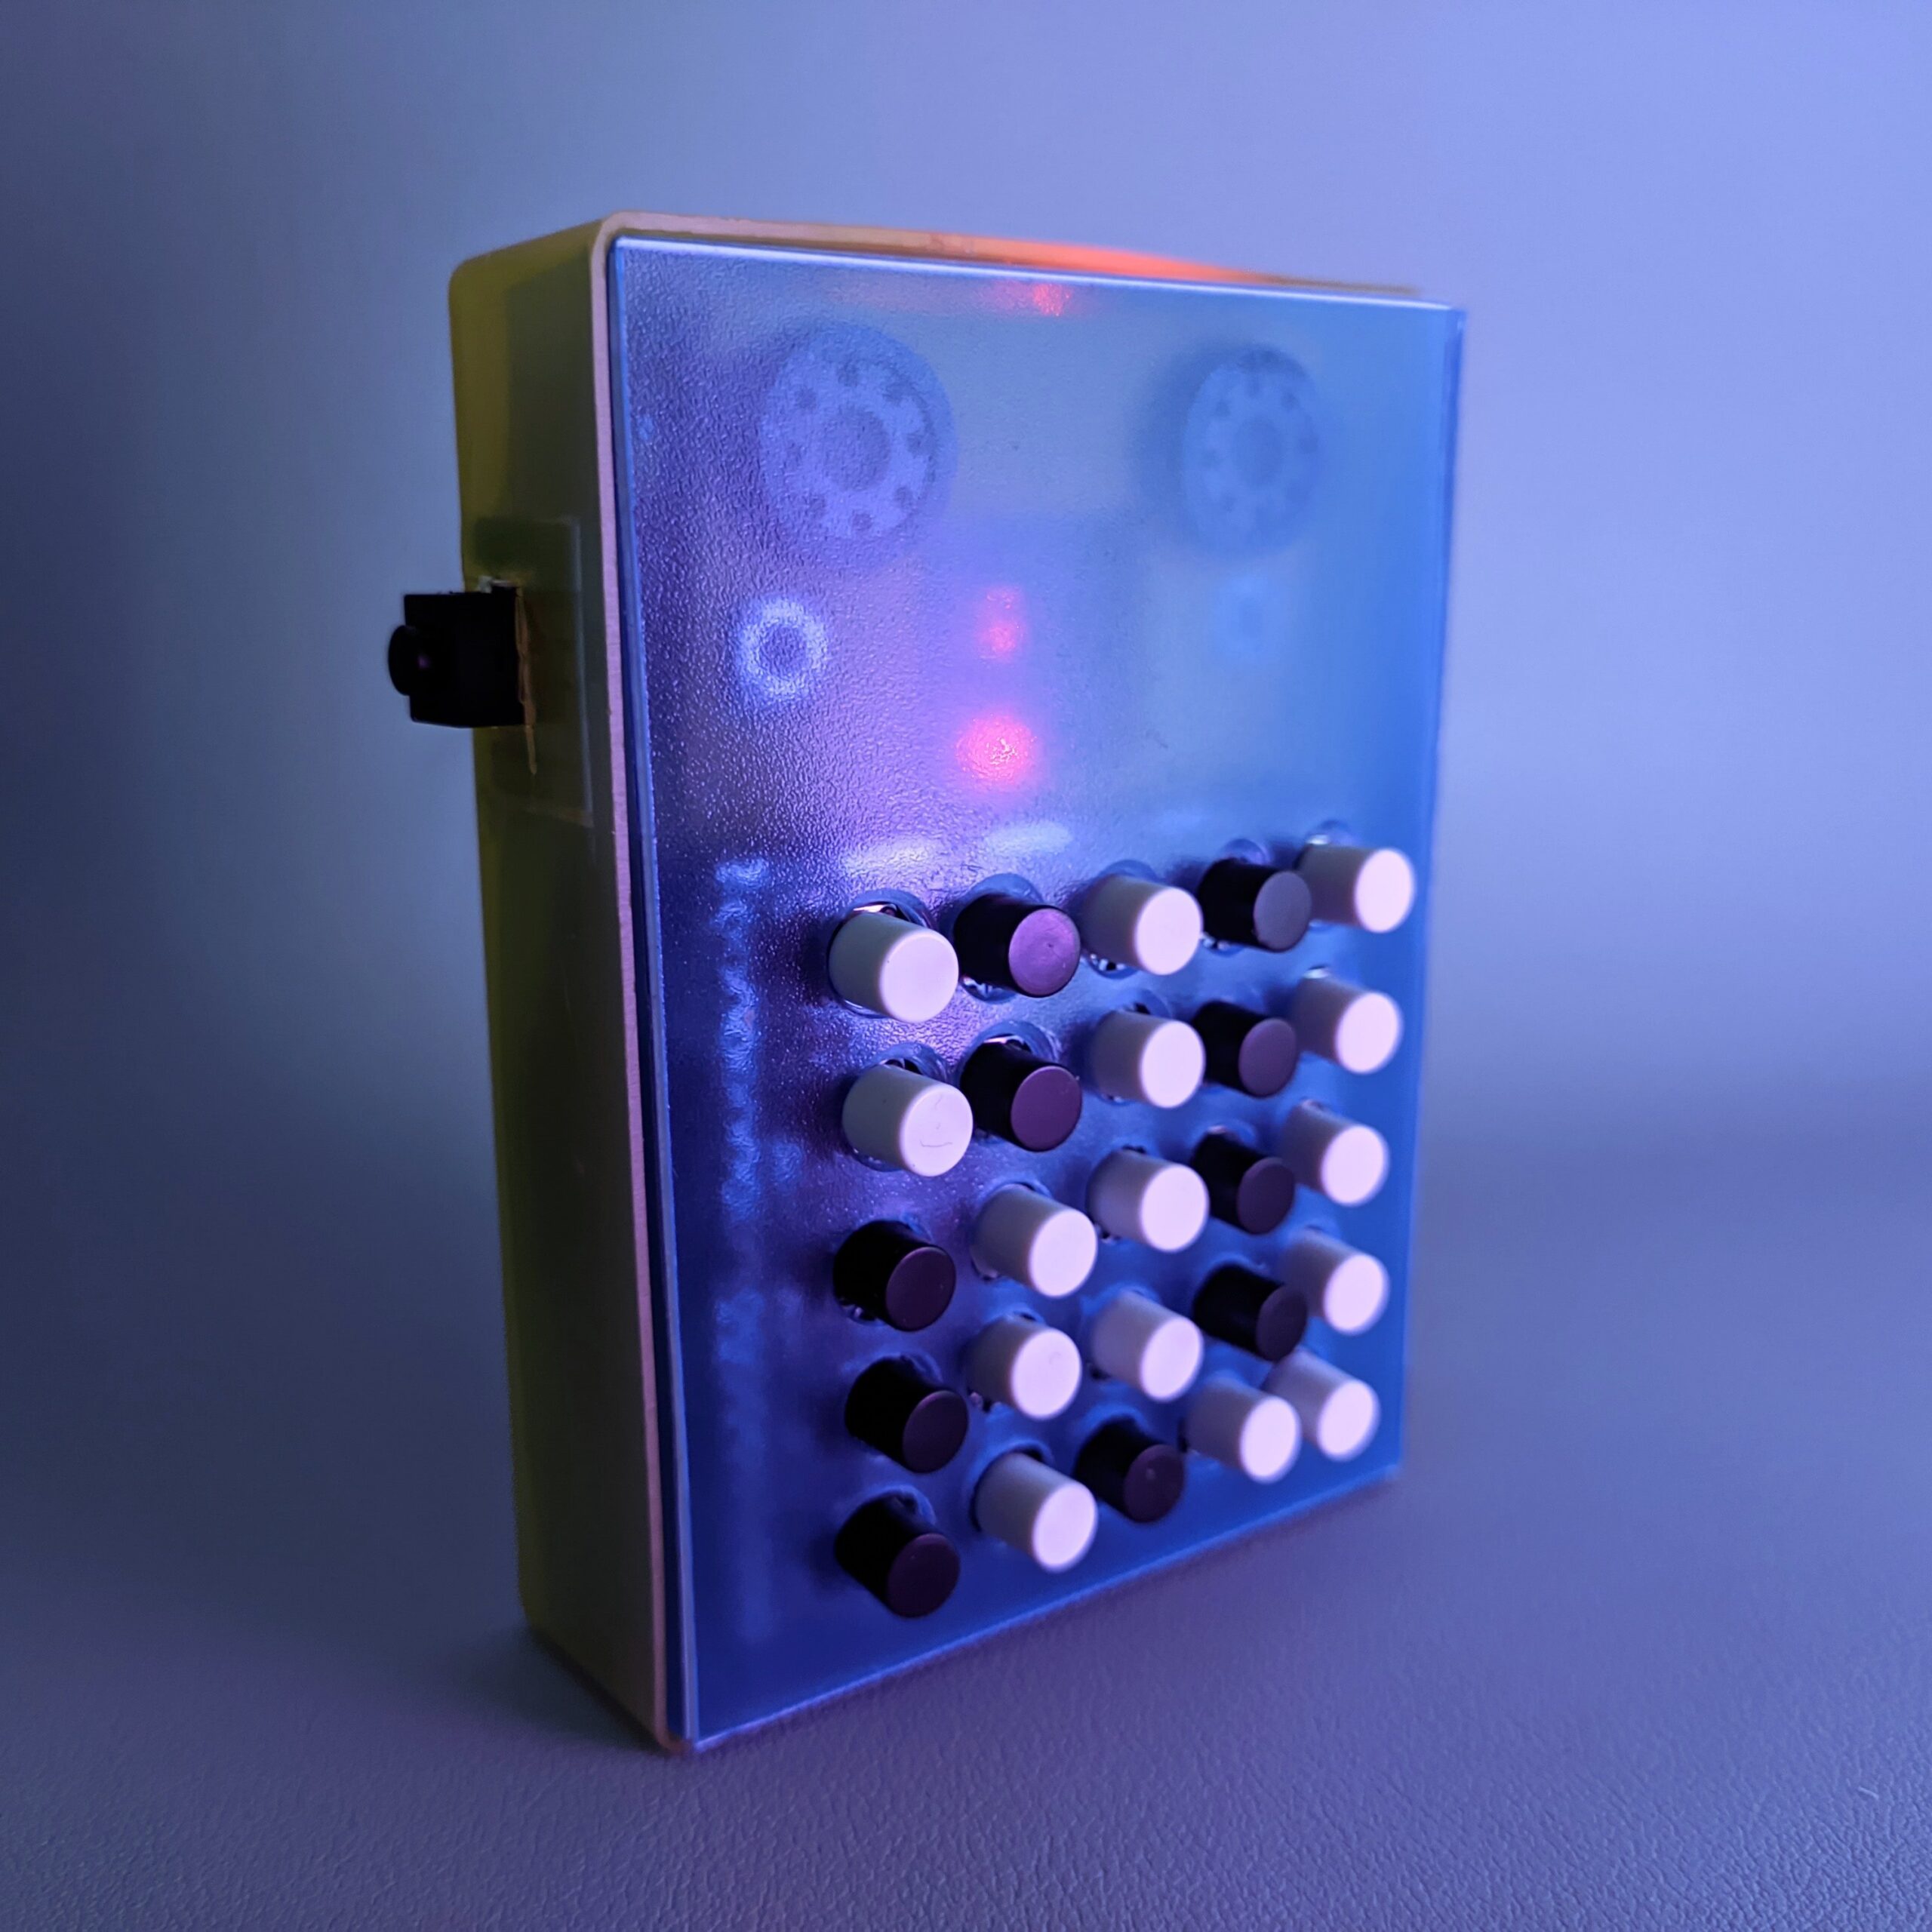
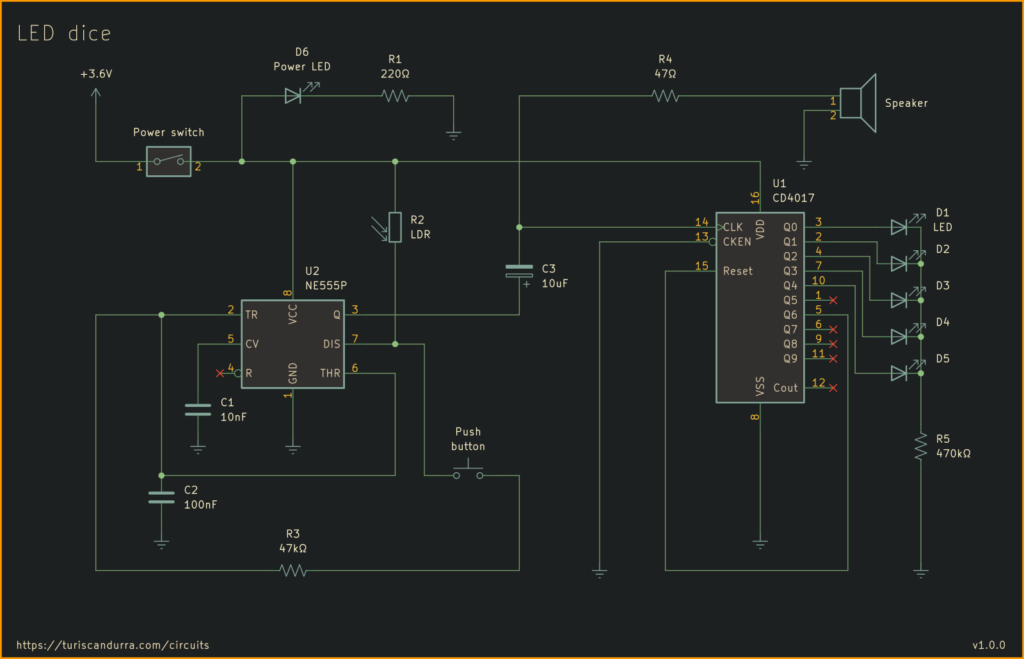
LED runners are circuits where LEDs turn on one at a time in a sequence. I made one with a twist, turning it into an electronic dice: you press the button to roll and release it to get a number. There’s also a speaker that emits a ticking sound and a light dependent resistor to control the speed of the run. It’s very slow in a dark room, and extremely fast in the sunlight.
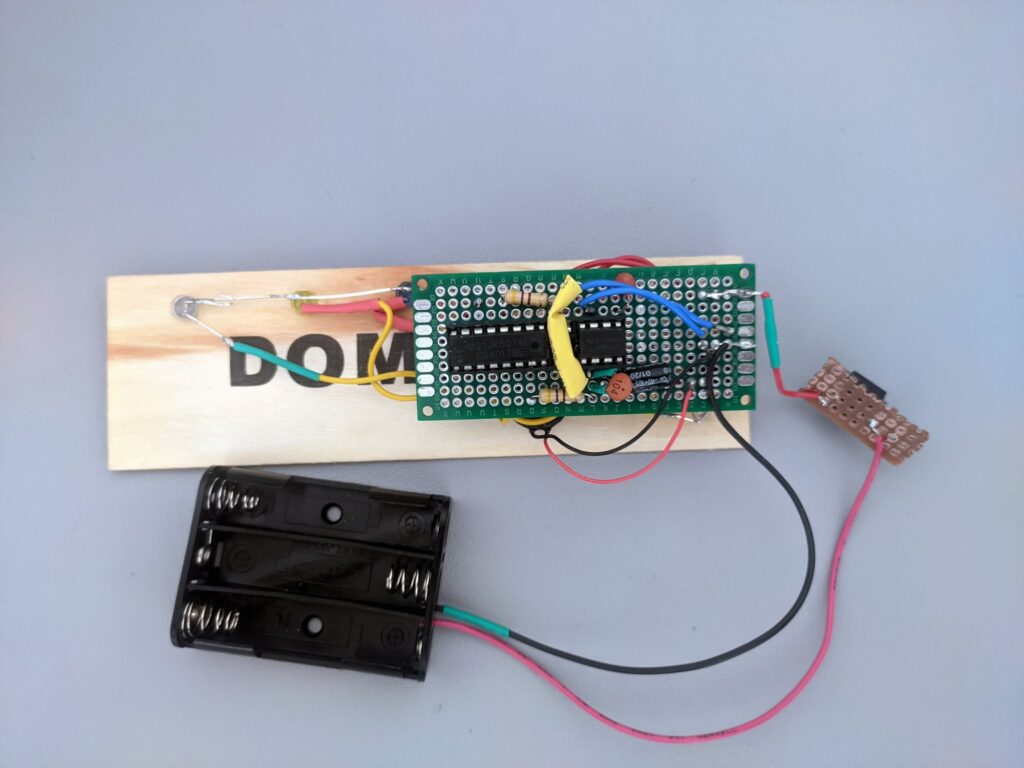
The signal originates from a 555 timer, whose output triggers a CD4017 decade counter (and the speaker, in parallel). As an enclosure I used a wooden domino box, and the little animal figures you see in the pictures are erasers, just for decoration. Rather than from one to six, the possible outcomes of my circuit range from zero to five. If you are building this and want a 6th LED, just connect it to the counter’s Q5 pin, and leave Q6 connected to RESET. The LEDs can share a single 470k resistor since they’re lit only one at a time.
For a future version of this project I would use a capacitor to ease out the roll after the push button is released.
I don’t play video games anymore, but I’ve always been fascinated by their hybrid nature, crossing artistic expression and a constant push for technical evolution. When I was a kid and the Commodore 64 was popular, game making had just become accessible to everyone. Now that the video game industry is larger than all the other entertainment industries combined, games contain universes, and spending time making a small game might feel pointless. However, these days ‘indie’ game development is thriving, its community is very active, and the resources required do make a game by yourself are freely available online. I can make things move on a screen, tell the computer what to do, make it beep. And I had a story to tell. A journey that’s emotional, profound, dramatic, and darkly mysterious.
I worked on the CIPD Profession Map, a framework used by HR and people professionals to guide them in their work, career planning and development. My role focused on interaction design and actual development of the interactive version of the map diagram. I also created a large set of illustrations centered around diversity and inclusion.
This project was the perfect opportunity to represent the many diversities of inclusive workplaces, while challenging common stereotypes regarding gender, ethnicity, age, physical abilities.
We went beyond the avoidance of preconceptions to appeal to a global audience – it was a conscious use of illustration as an unbiased brand language to speak for the professional values promoted by the campaign.
The people I was asked to draw are not just neutral models. They are active characters, interacting with each other, often displaying a hierarchy or relationship of power.